4.10 Other Integrations
In addition to the built-in integrations as detailed above, some 3rd-party plugin authors have created integrations with Forminator. This chapter will be developed as more such integrations become available.
4.10.1 CleanTalk Anti-Spam
CleanTalk has included support for Forminator forms, making it just too easy to protect your forms from spam submissions.
To get started, install CleanTalk on your site. You can install either via Plugins > Add New in your site admin, or download it from wordpress.org here.
7-day free trial
CleanTalk is a premium SaaS plugin that protects your WordPress site from spam. The plugin offers a 7-day free trial so you can test the service for yourself to see if it’s a good fit for your project.
Once installed and activated, go to Settings > Anti-Spam by CleanTalk, and click the Get Access Key Automatically button at the top. That will create a free account for you at CleanTalk.

You’ll then see that the buttons at the top have changed. Click on the one that says Click here to get anti-spam statistics to go to your new account at CleanTalk where you can view and manage any form spam it catches.

As this is a new install, you won’t see any data there yet. But you can test the integration by submitting your Forminator form with this test email address that will be automatically added to your blocklist there: stop_email@example.com

Note that, by default, users with the Administrator role are exempted from the spam protection in this plugin. So you’d want to either test with a different role, or test in a different browser. You can also disable protection of the Administrator role if you wish by clicking on the Advanced Settings link in the plugin settings, then scroll down to Roles which bypass spam test and de-select the role.

To customize or edit the list of blocked email addresses or domains in your CleanTalk account, click the Personal Lists link under your domain name.

As this is a free account automatically created for you by the plugin, you’ll be prompted to login with your username & password. That will have been sent to you automatically at the admin email address you have set in your site’s Settings. Check that email for the needed password.
Once logged in, you’ll see all the data for any blocked spam submissions. You can customize the criteria for spam blocking by adding filters to your list. Click the Add new filter button to get started.
See CleanTalk’s blacklist documentation for more information on customizing your lists.

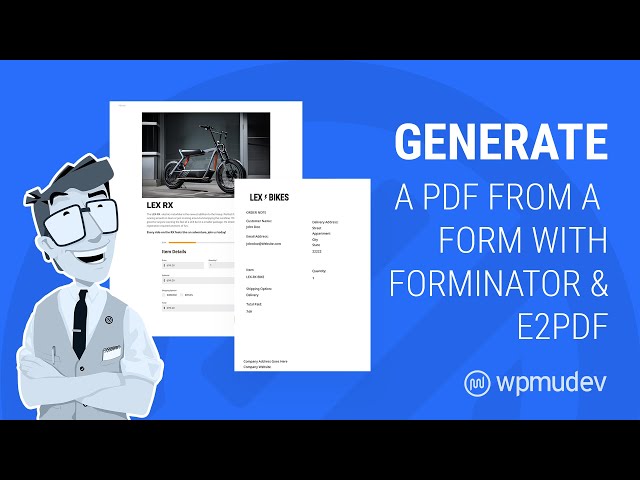
4.10.2 E2Pdf
Forminator integrates with the E2Pdf plugin which enables you to easily create PDF documents from your form submissions. Check out the video walkthrough below, or follow the written directions to set up your integration.
To get started, install either the free or pro version of E2Pdf. You can install the free version either via Plugins > Add New in your site admin, or download it from wordpress.org here.
Convert Forms to PDF
If you’re looking for a step-by-step guide on how to quickly generate a PDF from a form, check out our blog on how to Convert Forms to PDF Using Forminator.
Once installed and activated, click on the E2Pdf menu item in your admin menu. Then go to Settings > Extensions in that plugin’s options panel, and ensure that the Forminator option is not disabled.

Creating your PDF
To create a PDF for submissions from a Forminator form, go to E2Pdf > Templates, and click the Add New button.

In the modal that pops up, select Forminator from the available options in the Extension dropdown. Then from the Item options, select the form you want to use to create your PDF. Adjust other formatting options however you like in that popup; you can always edit them later.

Now you want to decide whether you want to create your PDF from scratch using only selected form elements, or if you want the plugin to create one automatically for you using all available elements from your selected form.
- Empty PDF – Click that button to create a blank canvas so you can add only the form elements you want.
- Auto PDF – Click that button to automatically add all available form elements to the canvas, and you can edit as needed.
Once you click either button, the popup will close, and you’ll have your PDF canvas all set up and ready to be customized.
Note that the free version of this plugin only allows you to have one PDF template active at any time.
If you had selected the Empty PDF option, or want to add more fields to an existing template (like an e-signature field, which does not import automatically), simply drag and drop them from the PDF Builder metabox on the right.

Double-click on any element in the canvas to edit its content, resize or move it. Right-click on any element to reveal additional options where you can map the PDF field to any other form field if needed. See also Things to Know When Mapping Form Fields below.

There are numerous other formatting options in this plugin which we won’t get into here. If you need more info on available options and how to use them, check out the extensive documentation & FAQs on the E2Pdf website.
Things to Know When Mapping Form Fields
e-Signature Field
If your form contains an e-signature field and you want that signature included in the PDF, you will need to add an E2PDF Signature field to your template, and map it to the e-signature field in your form, as noted above.
E2PDF Templates Are Static
The template you create in E2PDF does not automatically update if you modify things in the form that it fetches data from.
So if you make changes to your form like rearranging the field order, adding or removing fields, etc, you’ll need to manually update the existing E2PDF template or create a new one to use for your updated form.
Changing Multi-Select Fields
If your form contains checkbox, radio or select fields, there are a few additional things you should be aware of if you make changes to those particular fields in your form.
If the default Multiple Option Value in your form settings is set to use Option labels:
- An auto-created E2PDF template will use your form field labels in its fields.
- If you had manually created your template, then you need to also make sure that the E2PDF mapping properties Option uses the same string as your form field’s Label.
- You can change/edit the checkbox option values in your form’s fields at any time and your template will continue to work, but it will stop working if you change option labels. In this case, you’d need to manually edit and update your E2PDF template or create a new one.

If the default Multiple Option Value in your form settings is set to use Option values:
- An auto-created E2PDF template will use your form field values in its fields.
- If you had manually created your template, then you need to also make sure that the E2PDF mapping properties Option uses the same string as your form field’s Value.
- You can change/edit the checkbox option labels in your form’s fields at any time and your template will continue to work, but it will stop working if you change option values. In this case, you’d need to manually edit and update your E2PDF template or create a new one.

Integrating the PDF with your form features
To get your new PDF integrated with your form, there are a few shortcodes you can use depending on what you need. Once you have saved your PDF template, you’ll find all the available shortcodes for it in the metabox at the top-right of the E2Pdf Templates screen.

Click that Shortcodes button to reveal all shortcodes for your PDF. The ones we are most interested in for this integration are the attachment, download and view shortcodes. For example:
- [e2pdf-view id=”1″] – Embeds the PDF wherever you want to display it.
- [e2pdf-attachment id=”1″] – Creates an email attachment.
- [e2pdf-download id=”1″] – Creates a simple download link you can embed anywhere, even in emails.
View Shortcode
The “view” shortcode can be included in the After submission Inline Message that can be displayed on your form page once the user submits the form. You’d probably want to disable the Auto-close option so the message and PDF remain on-screen.

The PDF displayed in the success message could look like this example marathon calculator form:

Attachment Shortcode
The “attachment” shortcode can be included in the email notification sent to the user who submits the form so they can view or download your PDF directly from the email.

That would generate a familiar PDF attachment in the email sent to the user:

Download Shortcode
The “download” shortcode simply creates a PDF download link. It can be useful as well to include in the success message that displays after the user submits the form, or in the email notification sent to the admin or user, or anywhere else you might want to include it. The link would look like the examples below:

4.10.3 wpDataTables
An addon plugin is available for the excellent wpDataTables plugin that enables you to create frontend tables, graphs and charts from your Forminator form, quiz and poll submissions: wpDataTables integration for Forminator Forms.
wpDataTables Plugin Required
For this integration, you must already have the wpDataTables plugin installed along with Forminator. Note that this integration works just fine with both the free and pro versions of wpDataTables and Forminator.
Recommended Reading
Check out our blog post on Creating Amazing Free Frontend Tables, Graphs, and Charts with Forminator and wpDataTablesDataTables for more information on how to make the most of your form data with insightful visualizations.
To get started, install the wpDataTables integration for Forminator Forms plugin on your site. You can install either via Plugins > Add New in your site admin, or download it from wordpress.org here.
Once installed and activated, go to wpDataTables > Create a Table, select the Create a data table linked to an existing data source option, and click Next.

On the next screen, give your new table a Name; you can always edit this later.
Then, for the Input data source type option, select Forminator Form.
For the Choose a Forminator Form option, select the form, poll or quiz you want to use for your new table.

Note that the form, poll or quiz you want to use must have at least one submission stored in your database or you won’t be able to create a table with it, and will see an error like this if you try.

Once you’ve selected the form, poll or quiz you want, the Choose fields to show as columns option will be populated with all the fields that can be used in your table. Note that fields like CAPTCHA, HTML, Page break, Section, and Consent are not used in tables and are excluded.
Click that option to pop it open to view and select the fields you want included in your table. Click Select All or click on individual fields to highlight only the ones you want.

One you’ve selected all the fields you want to include in your table, click Save Changes at the top-right of the screen.
You’ll then see several new options & settings to explore along the top of the screen. Some of these options are only available in the Pro version of the wpDataTables plugin though.

- Data source – The screen you’re currently on and where you can change the source and/or included fields if needed.
- Display – Options to fine-tune the layout of your table for the frontend display.
- Sorting and filtering – Options to allow your users to filter and sort the data in your frontend table display.
- Table Tools – Enable copy & save options in your table like print, PDF, CSV, etc.
- Placeholders – (Pro only) Options here cannot be used with tables generated from Forminator data.
- Customize – (Pro only) Table styling options.
- Forminator Settings – Options to filter the Forminator data displayed in your table by ID or date range.
Once you’re happy with how you have your table set up, copy the shortcode from the top of the screen and add it to a page on your site to see how it looks and works.

You’ll likely want to come back to the settings to adjust things. There are way too many options in the wpDataTables plugin to go over here, which is outside the scope of this usage document.
For help with configuration of its many features, click a View Documentation link anywhere in that plugin to consult the extensive wpDataTables documentation.
Here are a few examples of the types of frontend tables & charts you can create from your form, poll & quiz data.
Data from a t-shirt order form:

Data from a frontend post form:

Graph of cumulative sales data:

Chart of data from a closed poll:

4.10.4 Clearout Email Validation
Clearout enables you to automatically filter out undesirable and invalid email addresses from your form submissions, and consequently from your email lists, ensuring only high-quality leads.
They provide 2 methods that you can use to integrate with your Forminator forms:
- A plugin method to apply the validation to all your forms
- A javascript method that you can apply to specific forms only

You can customize the message that appears when an email address does not validate under the Email Settings tab of your Email field.
Plugin Method
To get started using the plugin method for all your forms, first install the Clearout Email Validation plugin on your site. You can install either via Plugins > Add New in your site admin, or download it from wordpress.org here.
Next, log into your Clearout account, or create one now if you haven’t already.
Once logged-in, go to the Apps tab and click the + Create App button.

In the modal window that pops open, select the Server option. Then give your app a Name and an optional Description, and click Create.

Finally, click the copy icon next to your new app to copy your app API Token.

Now go back to your site, navigate to Settings > Clearout Email Validator in your site admin, and paste the Clearout API token in the field provided.

Then scroll down to the Apply Validation section of the plugin settings where you’ll see a list of compatible plugins. Clearout now integrates natively with Forminator. Enable the Forminator Form checkbox in the Select Forms option. Then, click on Apply to complete the integration.

This integration will now affect all Forminator forms on your site.
Javascript Method
To use the javascript method for specific forms, first log into your Clearout account, or create one now if you haven’t already.
Once logged-in, go to the Apps tab and click the + Create App button.
In the modal window that pops open, select the Client (JavaScript Widget) option. Then give your app a Name and an optional Description. Customize any of the other options if you wish, then click Create.

Finally, click the copy icon next to your new app to copy your app’s JS code.

Now go back to your site and, on the page where you have embedded your Forminator form, add a code block in the Gutenberg editor. Paste your Clearout app’s JS code in the block, then click the Update button for your page.

This integration will now affect only this particular form on your site.
Not using the Gutenberg editor?
If you’re using the Classic Editor or a page builder to create & edit your pages, you may not be able to add a code block as above. So an easy alternative is to use a free plugin like Shortcoder where you can add the Clearout JS code and generate a shortcode that you can add to your page instead.
Possible Issues
If your form is embedded in a Hustle module and the email validation is not working on your site, try setting the form’s submission Method to Ajax instead of Page Reload.
4.10.5 Complianz
Complianz integrates with Forminator out of the box when configuring that plugin.
The Complianz Cookie Consent plugin does not have any settings specific to Forminator. However, when configuring that plugin, you may come across some options that may impact your Forminator forms.
For example, Complianz has a setting to hide Google reCAPTCHA if the corresponding cookie option is not accepted by a site visitor. So if you’re using reCAPTCHA in your forms, you’ll want to be aware of that.

4.10.6 Groundhogg
Groundhogg Marketing Automation & CRM has created an integration plugin that enables you to add any contact info submitted through a Forminator form to your marketing funnels.
To get started with this integration, we’ll assume you already have the Groundhogg plugin installed and configured on your site.
Whether you have a paid Groundhogg plan or have purchased just the Forminator Integration plugin, you’ll find it in the All Access Downloads area in your Groundhogg account.
Download the integration plugin, then upload the zip file to your site via Plugins > Add New > Upload.
Once the integration plugin is installed and activated, go to Groundhogg > Funnels in your site’s wp-admin.

Once there, you can either create a new funnel or edit an existing one to include integration with any Forminator form. For the purposes of this document, we’ll create a simple new funnel.
Click the Add New button, then click the Start Building button in the Start From Scratch option.

On the next screen, click the + Add Step button and, in the modal window that pops open, select Forminator under the Benchmarks tab.

Next, select the form you wish to use for this integration, and click the Map Fields button.

In the modal window that pops open, you’ll see all the fields from your Forminator form listed in the 2 columns on the left, which you can map to any Groundhogg field you need by selecting it in the corresponding dropdown on the right.

Once you have mapped all your form fields, click the Save Changes button at the bottom of the modal.

Finally, set your funnel to Active and click the Save button.

You’ll then see the form field information you mapped appear in the Groundhogg Contacts section whenever a user fills in your selected Forminator form.

Any other steps you wish to add to your Groundhogg funnel are beyond the scope of this document. For help with that and any other issues with Groundhogg configuration, please see their support documentation.
4.10.7 WP E-Signature
ApproveME WP E-signature has created an integration plugin that enables you to collect legally binding digital signatures on contracts after a form submission.
To get started, you need to install and activate the WP E-Signature, WP E-Signature add-ons, and the Forminator Signature add-on plugins.
Download the plugins, then upload the zip files to your site via Plugins > Add New > Upload. These plugins are included in the ApproveMe Elite and Lifetime plans.
For this integration to work, you must add name and email fields to your Forminator form, as they are required to create the contract document.
Navigate to E-Signature > Add New Document, and choose the Stand Alone option.

Enter the contract title and content. Then, click the pencil icon and choose Forminator Data.

In the modal window that pops open, choose the form that you want to connect the contract document to then, click the Next Step button.

In the first dropdown menu, choose Insert all fields. For the Select a display type drop-down menu, you get to choose to display the values of the fields only, values and labels, or labels only.
We recommend choosing the Display label + value option, so it is clear when the user views the contract document which value corresponds to which field. Then, click the Add to document button.

This adds a shortcode for each field in your Forminator form. Feel free to remove field shortcodes that you don’t want to include in your contract document. Make sure that you don’t remove the name and email shortcodes as they are required to create the document.

In the Document Options section, tick the Create a new WordPress page for this document checkbox and choose any additional configuration setting you’d like to apply to your document. Then, click the Publish Document button.

A modal window pops up to let you know that you need to complete the configuration on the form’s editing screen. Click Let’s go now! to navigate to the form editing screen.

Navigate to the Integrations tab where you will find WP E-Signature under the Connected Apps. Click the plus icon.
![]()
In the E-Signature Settings pop-up modal, choose the name field for the Signer Name and the email field for the Signer Email.
For the Signing logic, you can choose between Redirect user to the E-Signature document after submission or Send user an email requesting their signature after submission options. And for the Display Type, you can choose whether or not you want to underline the data that was submitted in the form.
In the Select Document dropdown, choose the contract document you want your user to sign.
You can also tick the Enable Signing Reminder Email checkbox to do just that then, click the Update button.

Finally, navigate to the form’s Settings tab and ensure that you have enabled the Store submissions in database option to ensure triggering the E-Signature document when the form is submitted.

Depending on how you configured your document, once users submit the form, they will be redirected to the page where they can sign the document or receive an email that includes a link to the document they need to sign. This is how the document looks on the front end:

Any other configuration settings you wish to apply to your WP E-Signature document are beyond the scope of this document. For help with that and any other issues with WP E-Signature configuration, please see their support documentation.
4.10.8 Friendly Captcha
Friendly Captcha has included support for Forminator forms, making it so your users don’t have to do anything to solve a captcha. With this integration, the captcha is solved automatically as soon as a user begins filling out a form.
To get started, install the Friendly Captcha plugin on your site. You can install it either via Plugins > Add New in your site admin, or download it from wordpress.org here.
30-day free trial
Friendly Captcha is a premium SaaS plugin starting at €9/month for commercial use. The service comes with a 30-day free trial so you can try it out and see if it’s a good fit for your project. Note that for personal or hobby sites, it is free to use for up to 1000 requests (captcha solves) per month.
Once installed and activated, go to Settings > Friendly Captcha, and click the link to create a Friendly Captcha account if you don’t already have one.

Follow the steps to create your account and set up your organization. Then go to Applications and click Create new application.

Fill in the form to create a key for your site. Then copy the generated Application key and paste it in the Sitekey field in the Friendly Captcha settings in your site’s wp-admin.

Next, go to API Keys in your Friendly Captcha account. Enter any recognizable name you want for your API key, and click Create API Key.

Copy the generated API Key and paste it in the API Key field in the Friendly Captcha settings in your site’s wp-admin.

Then scroll down to the Integrations section in the Friendly Captcha settings in your site’s wp-admin, and check the box next to Forminator to enable the integration.

Click Save Changes at the bottom of the Friendly Captcha settings screen and you’re done.
There are no additional settings to configure in Forminator, and no need to add a captcha field in your forms.
Now, when you load any form on the frontend of your site, you’ll see the Friendly Captcha widget just above the Submit button.

As the user begins filling out the form, the captcha will begin to solve itself automatically.

By the time the user is ready to hit the submit button, the captcha will already be solved.

4.10.9 Simple Cloudflare Turnstile
Simple Cloudflare Turnstile plugin enables you to add a Cloudflare captcha to your Forminator forms to protect spam entries.
To get started with this integration, we’ll assume you already have the Simple Cloudflare Turnstile plugin installed and configured on your site.
Once the integration plugin is installed and activated, go to Settings > Cloudflare Turnstile in your site’s wp-admin.
To get started you need to enter your Cloudflare site and secret keys. First, log in to your Cloudflare account and navigate to this URL https://dash.cloudflare.com/?to=/:account/turnstile
On the Turnstile Sites page, click on the Add Site button.

To add a new Turnstile site, enter your site name, select your domain, choose your preferred widget mode, and click Create.
Note: To add a domain to Cloudflare, refer to this Cloudflare documentation on how to add domains to Cloudflare.

Copy the generated Site and Secret keys

In your wordpress dashboard, paste the copied keys in their respective fields and check the enable on all forminator forms field to display cloudflare captcha on all forminator forms by default. You can also exclude forms by mentioning their IDs in the Disabled Forms ID field.
From the Widget Location drop-down select where you want the captcha to be displayed and Save the changes.

The final step is to test if the integration is successful. Click on the Test Response button to initiate a sample request/response test.

If the integration is successful, the cloudflare captcha will be displayed on the enabled forminator forms.

4.10.10 Zoho Flow
In their own words, Zoho Flow is a low-code integration platform that extends integration capabilities for Forminator users, not only with other WordPress plugins but also with the Zoho Ecosystem, various cloud applications, and on-premises applications, including databases.
While you can integrate Zoho with Forminator using webhooks, they have created an integration plugin that makes it just too easy to get things done.
15-day free trial
Zoho Flow is a premium service that offers a range of features to help you automate and streamline your workflows. You can sign up for a 15-day free trial to test the service and determine if it’s a good fit for your project.
To get started, install the Zoho Flow plugin on your site. You can install either via Plugins > Add New in your site admin, or download it from wordpress.org here.
Once installed and activated, go to Zoho Flow > Integrations and select Forminator from among the available integrations.

Click the + New API Key button.

In the modal window that pops open, enter a recognizable label for your new API key, and click Generate.

Copy the generated API Key and the Base URL and paste them into a text file for the next steps.

Note that you will not be able to retrieve the API key once the modal window is closed. The Base URL is simply your site address, without the trailing slash at the end.
Next, create your Zoho Flow account at https://flow.zoho.com if you haven’t already, and login. Then go to My Flows and click the Create Flow button.

Enter a name for your new flow, select or create a new folder where you want to store it in your account, give it a description, and click Create.

On the Builder screen, click Configure in the App trigger section.

Scroll through the available apps until you find Forminator. Select it and click Next.

Select whether you want your flow to be triggered when a Forminator form, poll or quiz is submitted, and click Next.

Click the Connect button to create the API connection needed for Zoho to communicate with your site and fetch data from Forminator.

Give your API connection a name, then enter the API Key and Base URL you copied earlier from your site admin, and click Authorize.

Note that once you have authorized an API connection with your site for your first flow, you will not need to authorize it again for new flows from that site unless you delete the API key from your site.
Select the specific form, poll or quiz you want to use for this flow.

Optionally click on Filter criteria and fine-tune the flow to only trigger when certain Forminator field values or conditions are met. Click Done when you’re finished.

You have now successfully created a Zoho flow that triggers when a Forminator form, poll or quiz that optionally meets your filter criteria has been submitted on your site.

The next steps of what you do with that data are entirely up to you, and are beyond the scope of this guide. If you need help continuing with your setup, Zoho has extensive documentation and tutorials in their knowledge base.
4.10.11 SureTriggers
SureTriggers enables you to connect Forminator with hundreds of 3rd-party apps right in your site admin. Note that this integration only works with forms, not polls or quizzes.
To get started, install the SureTriggers plugin on your site. You can install either via Plugins > Add New in your site admin, or download it from wordpress.org here.
Once installed and activated, go to SureTriggers in your site admin. Follow the prompts to create and authorize a free account at SureTriggers if you haven’t already done so.

Once back on the SureTriggers page in your site admin, click + Create Workflow.

Enter a name for your new workflow and click Start Building.

The modal window will close and the builder screen will appear. Click + Add Trigger.

In the Add Trigger window that slides open, search for or scroll through the list to locate and select Forminator as your trigger.

The only trigger event available for this integration is when a form is submitted, so that will be selected by default. In the Select Connection field, select your current site that displays there.

Next, scroll down in the Add Trigger window and select the form you wish to use for this workflow.

You’ll get a prompt to Execute the Event within the next 5 minutes. That means SureTriggers needs you to fill in your selected form on a page on your site and submit it so the form data can be fetched.
As soon as you create a submission using your selected form, that window will refresh and display the data it found to confirm that the connection is working as it should. Click the Save button to complete the trigger step.

You have now successfully created a SureTriggers workflow that triggers when a Forminator form has been submitted on your site. Click the (+) button to start adding Actions to your workflow.

The next steps of what you do with that data are entirely up to you, and are beyond the scope of this guide. If you need help continuing with your setup, SureTriggers has extensive documentation and tutorials in their knowledge base.